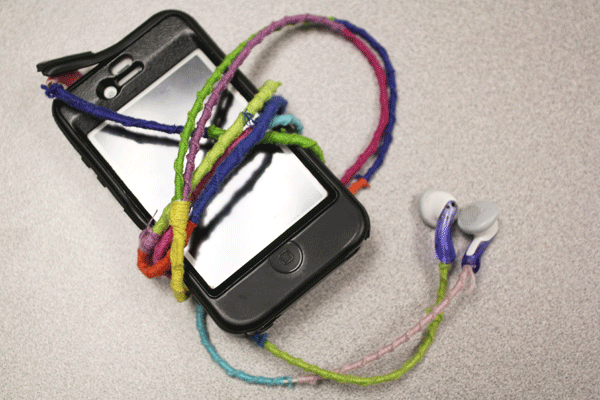
JagWire staff members try out some fun crafts you can do with items you find laying around your house
Earbud wrap:
Materials:
- A pair of earbuds
- Different colored string
- Scissors
1. Start at the plug-in end of your headphones
2. Begin knotting the thread around the headphones. Knot these like you would a friendship bracelet. After awhile you will see a natural spiral form from the knots.
3. Pick a point that you choose to end a color and knot tightly.
4. Continue knotting with another color of thread.
5. When you reach the part where your headphones split in into separate parts to your earbuds, tie off the knot and continue down each one separately until you reach the end.
6. Continue doing this until you reach the earbud part of your headphones. You now have a cool new pair of headphones.
Earrings:
Materials:
- Feathers
- Wire
- Wire cutters
- Earring hooks
- Jump rings
1. Start with two feathers.
2. Puncture a small hole in the top of the feather stem with a needle.
3. Take a jump ring and slide it through the hole of the feather.
4. Connect the other jump ring onto the first one to allow space between feather and earring hook.
5. Close the jump rings around the earring hook.
6. Tighten the jump hooks around the earring hook.
7. Shake out the earrings to make sure they are secure.
Glass Art:
Materials:
- Broken mirror pieces
- Frame from broken mirror
- Water colors
- Hot glue gun
1. Paint the coffee filters in tie dye design and then let them dry.
2. Glue them to the background piece of your frame.
3. Allow the glued down coffee filters to dry.
3. Get your broken glass and assemble glass pieces to spell out something or design what you want them to look like. Break glass as necessary.
4. Hot glue them on top of the coffee filters.
5. Bunch up extra colored coffee filters and use them as flowers.
6. Let the piece dry over night.
Glitter Window Clings:
Materials:
- Ziplock baggie
- Computer paper
- Fabric paint
- Glitter
- Draw a simple and easy to draw design on the piece of computer paper.
- Place your design inside the baggie. Trace the outline of your design on the outside of the baggie using the fabric paint.
- Sprinkle with glitter while the paint is still wet.
- Shake excess glitter in the trash can and set aside to dry.
- Once the paint is dry, carefully peel the final product off the baggie.
The fabric paint gives a small sticky back, making it a great window cling.
Crayon Craft:
Materials:
- Canvas
- Hot glue gun and glue sticks
- Crayons
- Blow dryer
- Use the hot glue gun and glue the crayons in the order and design you want onto the canvas.
- Allow the glue to dry.
- Take the blow dryer and melt the crayons downwards.
- Allow time to dry until wax is cooled and hardened.
Crafting Tips:
- Store your materials in labeled storage boxes so no materials get lost.
- Clean as you go, it is less of a hassle to clean up after you are done.
- If you are doing a messy project, lay down a layer of newspaper and just wrap up and throw away when you are cleaning.
- Throw away old and broken materials. The more space you make, the more new material you can store.
- Look for deals at craft stores; some will sell more materials than others.
- Look on websites like Pinterest for new and easy craft ideas.


Madison • Feb 25, 2013 at 9:00 pm
Hi, i LOVE the ear bud idea, but if your going to do molten crayon art it can be really messy and dangerous. I do it in my art studio, and burnt the feeling out of part of my hand. If you guys do do this BE VERY CAREFUL, and i would consult professional help or at least someones who has done it before. woo-hoo go jaguars!